Want to make beautiful scented candles at home with everything you need in one box?

First impression
You open the box and you immediately see that FAIRYELF aimed to be generous with supplies. The kit feels like it’s designed to get you making candles right away without extra purchases, which is great if you want a low-friction start to candle crafting.
What’s included
You’ll find a wide range of tools and materials that cover the candle-making basics plus some extras for creativity. The set lists everything clearly, so you won’t be surprised by missing pieces when you’re ready to pour your first candle.
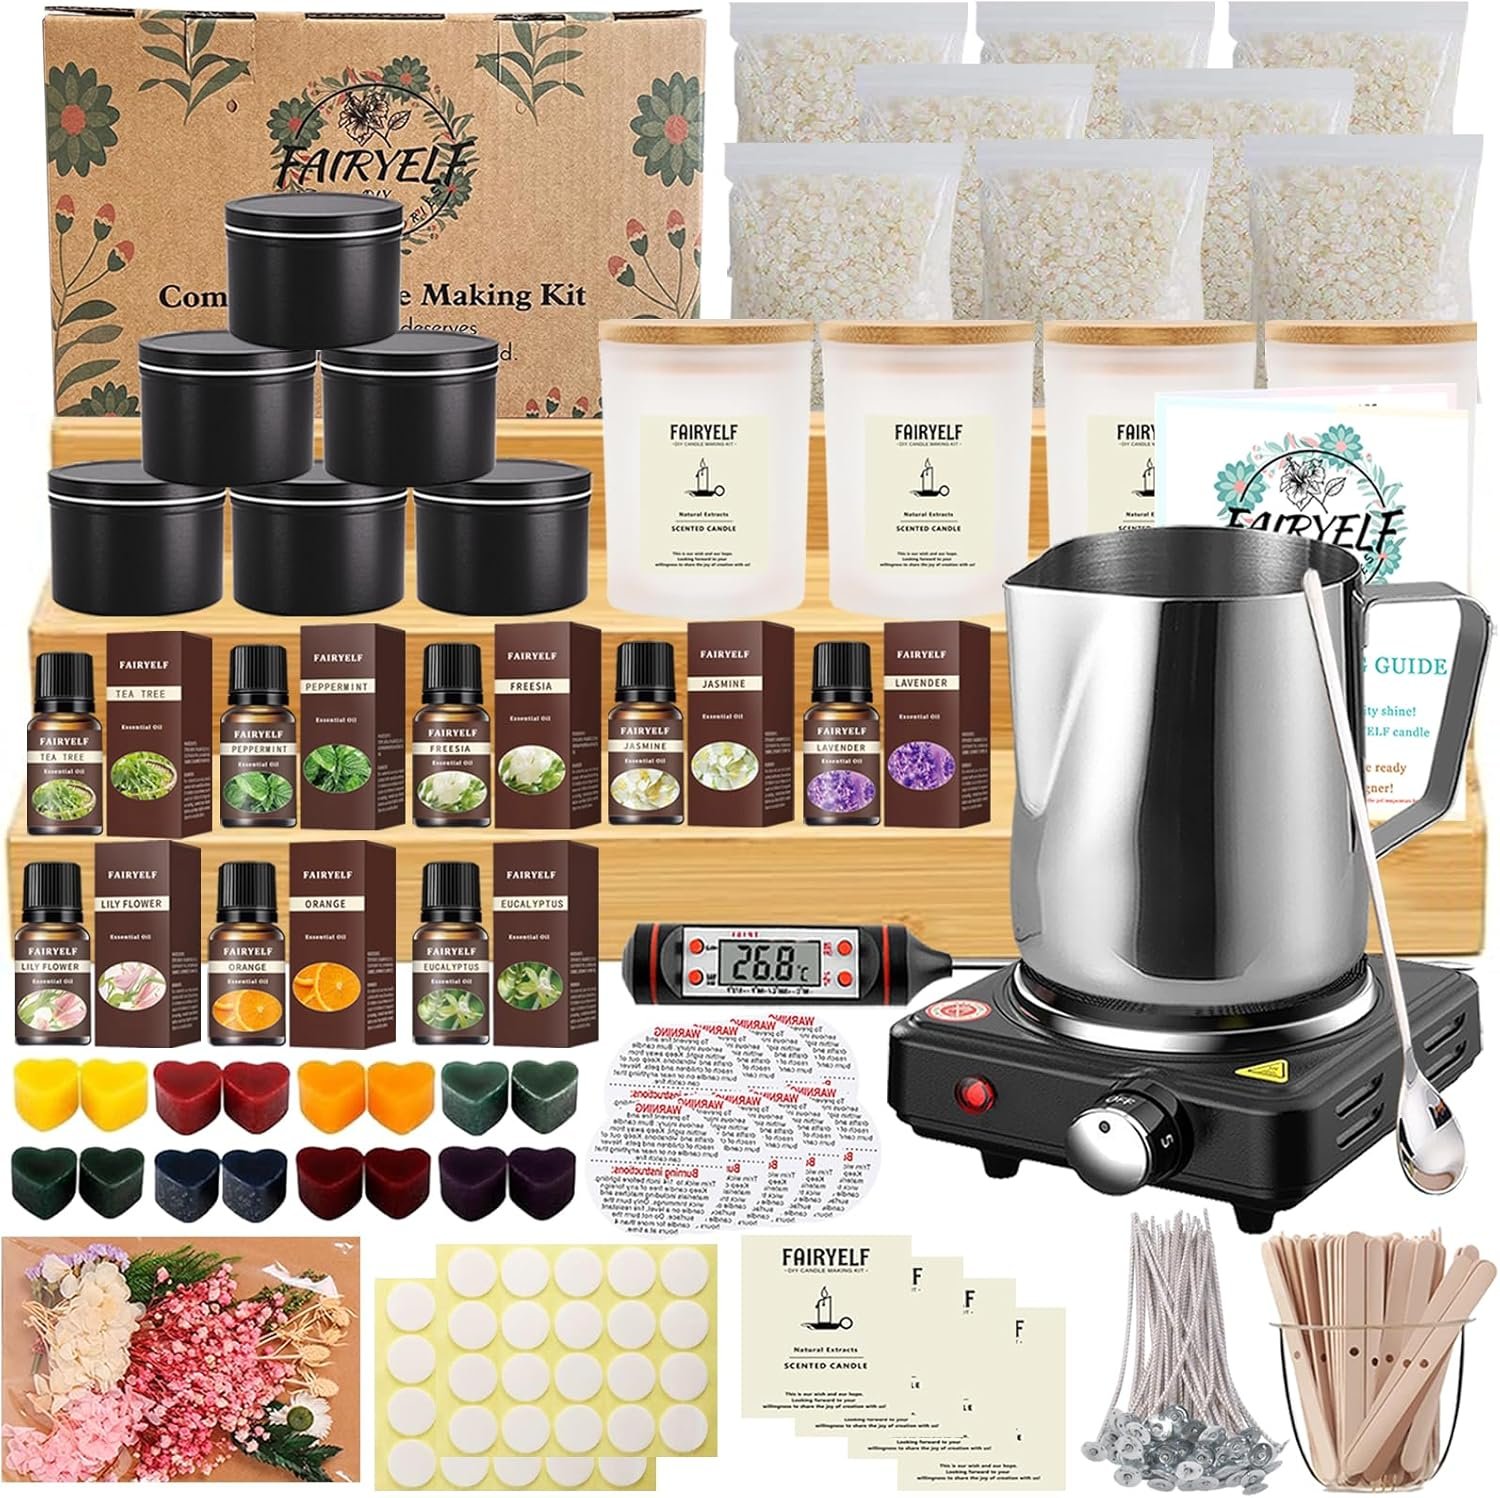
| Item | Quantity | Notes |
|---|---|---|
| Wax melter (heating plate with pot) | 1 | 500W, 5-speed temperature control |
| Melting pot | 1 | Fits on the melter, designed for safe heating |
| Black candle tins (with lids) | 6 | Reusable metal tins |
| Covered glass jars | 4 | Small jars with lids for gifts |
| Soy wax packs | 8 | Natural soy wax, with additives to reduce frosting |
| Candle scents | 8 | Fragrance oils included |
| Thermometer | 1 | For monitoring pouring temperature |
| Stirring spoon | 1 | For mixing wax and fragrance |
| Dye blocks | 16 | Multiple colors for customization |
| Candle wicks | 20 | Different lengths/amount for various vessels |
| Stickers | 20 | For labeling or decorating your jars/tins |
| Wick center devices | 6 | Helps keep the wick centered while pouring |
| Candle labels | Various | Decorative and practical |
You’ll notice that the kit emphasizes soy wax and includes a temperature-controlled melter. This combination makes a noticeable difference in how straightforward the process feels, especially for first-timers.

Quality of components
The kit’s components feel like a balance between beginner-friendly and decent quality for hobbyists. The tools are made for repeated use and the wax and fragrances are packaged in a way that minimizes mess and waste.
You’ll find the steel melter and pot sturdy enough for regular use, while the tins and jars are attractive enough to give your finished candles a professional look. The thermometer and wick centering devices are simple but effective, which helps reduce common beginner mistakes.
How easy is it to use?
This kit is explicitly built for people who haven’t made candles before, and that shows in the included illustrated instructions. The manual walks you through heating, coloring, scenting, and pouring so you’ll have a step-by-step reference that keeps things predictable.
You’ll still need to pay attention to temperatures and timings, but the melter’s adjustable settings and thermometer let you control the process safely. Following the instruction sheet will get you consistent results once you practice a couple times.
First-time maker experience
Your first candle might not be museum-perfect, and that’s okay — the kit is forgiving. The included wick center devices and pre-measured or easy-to-measure ingredients reduce the room for error, and you’ll quickly learn how much fragrance and dye you prefer.
Expect to make a few test candles to dial in scent load and wick size, and treat those trials as part of the learning curve. You’ll be surprised how much progress you can make after two or three attempts.

Performance of the wax melter
The 500 watt heating plate gives you steady, controllable heat that’s important for even melting. You’ll appreciate the five-speed adjustment, which lets you choose a gentler heat for delicate fragrance blends or a faster melt when you’re in a hurry.
The melter aims to avoid overheating and scorching the wax, which can damage fragrances and create off-smells. If you follow the recommended settings — usually 2-3 for candle wax — you’ll maintain fragrance integrity and avoid burning the wax.
Wax and scent quality
You’ll be using 100% natural soy wax that’s been blended with plant-based additives to reduce frosting and improve scent throw. The wax tends to burn cleaner and produce less soot compared to paraffin, which matters if you’re making candles for indoor use or gifting.
The included fragrance oils are varied and convenient, allowing you to test different scent profiles. You may prefer to adjust the fragrance load slightly depending on whether you like subtle or strong scents; the kit gives you the flexibility to do that.

Safety and efficiency
Safety is built into the kit with tools like the thermometer and the controlled heating plate. You’ll avoid the biggest hazards—overheating and spilling—if you set the melter correctly and keep an eye on temps while pouring.
Always use a stable surface and work in a well-ventilated area. Keep a fire extinguisher or baking soda nearby just in case, and never leave the melter unattended while it’s on.
Craft versatility
This kit isn’t only for making simple container candles — you can get creative with color layers, scent combinations, and different vessel types. The five-speed melter even lets you melt ingredients for other small crafts if you want to branch out.
If you’re curious about trying wax melts, layered candles, or combining soy wax with other natural additives, the kit gives you enough variety to experiment within the soy wax framework.
Suitable projects
You can make scented tin candles, glass jar candles for gifts, color-block or marbled designs with the dye blocks, or small sample candles for events. The tools provided also let you test custom fragrance blends so you can make signature scents for gifts or retail.
You’ll also be able to assemble small gift sets with the included stickers and labels, which is perfect if you plan to give candles for holidays or special occasions.

Step-by-step quick guide to make your first candle
This simple procedure gets you from kit to finished candle with a minimum of fuss. Follow the steps, keep safety in mind, and adjust based on your observations and preferences.
- Prepare your workspace: Lay down a heat-resistant mat and keep paper towels nearby. Make sure your melter and pot are clean and dry.
- Measure wax: Use the recommended weight or a measuring cup to portion wax appropriate to the vessel size. You can start with one tin or jar to practice.
- Melt wax: Set the melter to a low-to-medium speed (2–3 recommended) and place the pot on the heating plate. Stir gently as the wax liquefies.
- Monitor temperature: Use the thermometer to check that the wax reaches the pouring temperature recommended for soy (usually around 125–150°F / 52–65°C, but follow included guidance). Avoid overheating.
- Add dye and scent: Mix in dye blocks until you reach the desired color, then add fragrance oil at the recommended percentage (often 6–10% by weight, but test small batches if unsure).
- Set the wick: Attach and center the wick in your container using the wick centering device. Keep the wick taut and straight.
- Pour wax: Slowly pour at a steady pace to avoid air bubbles. Fill to the desired level and allow to cool undisturbed.
- Cure and finish: Let candles cool and cure for the suggested time (commonly 24–48 hours). Trim the wick before first burn and add labels or stickers for presentation.
You’ll find that the whole process becomes faster and more polished after a couple of tries, and the kit’s tools make each step manageable.
Pros and cons
You should weigh the strengths and limitations before you buy, especially if you have a specific candle style or production volume in mind. Below are practical points that matter for usability and value.
Pros:
- Comprehensive kit: everything needed to get started is included.
- Soy wax: cleaner-burning, plant-based wax with reduced frosting.
- Temperature control: 5-speed melter offers safer, more precise heating.
- Attractive vessels: tins and glass jars look gift-ready.
- Ample supplies: multiple dyes, scents, and wicks for experimentation.
- Illustrated instructions: helpful for beginners.
Cons:
- Learning curve: you’ll still need to test wick and scent loads for best results.
- Melter size: the pot’s capacity limits large-batch production.
- Fragrance strength: some included scents may be subtle and require more oil for a stronger throw.
- Dye consistency: achieving perfectly even coloring takes practice.
You’ll find most limitations are normal for starter kits; they’re meant to introduce you to the craft rather than replace professional equipment for large-scale production.

Who is this kit best for?
If you’re new to candle making or you want a convenient giftable kit to try the craft, this set makes a lot of sense. You’ll also enjoy it if you like to gift handmade items or want to teach a small group.
You might outgrow the kit if you plan to produce dozens of candles regularly for sale. For occasional makers, hobbyists, or those testing a new creative interest, it’s a smart, user-friendly option.
Value for money
When you compare what’s included to the retail costs of each individual item, the kit often represents a good value. You’re getting a melter, pot, multiple vessels, lots of wax, fragrances, colors, and tools all in one purchase.
You’ll need to consider how much you plan to make and whether you’ll want higher-end fragrances or larger equipment later. For starting out and making decent-quality gifts or personal candles, the price-to-supplies ratio is favorable.
Maintenance and storage
Taking care of your tools extends their life and keeps your workspace safe, so you’ll want to adopt a few basic habits. Clean the melting pot and stirring spoon after each batch, and store fragrances and dyes in cool, dark places.
Keep your wax sealed to prevent dust and keep fragrances capped to avoid evaporation. When you’re not using the melter, unplug it and store it where children and pets can’t reach it.
Troubleshooting common issues
You’ll likely encounter a few minor problems as you learn, but most have straightforward fixes that you can apply quickly.
- Weak scent throw: Increase fragrance load slightly or let the candle cure longer. Try different pouring temperatures as some fragrances are sensitive to heat.
- Frosting on surface: Use the kit’s soy wax additives and avoid pouring at too-warm temperatures. Light sanding or melting the top layer lightly with a heat gun can smooth the surface.
- Tunneling wick: Choose a larger wick or trim the wick to 1/4 inch before burning. Ensure the first burn lets the melt pool reach the edge of the container.
- Uneven color: Stir dye thoroughly while the wax is fully liquid, and pour steadily to reduce streaking.
- Sinkholes: Top up the candle with a small pour of warm wax to fill any depressions after the first cooling cycle.
You’ll get better results faster as you pay attention to these variables and record what worked for each fragrance and vessel.
Scent mixing and customization tips
You have plenty of scent oil packs to experiment with, and mixing fragrances can yield unique combinations you won’t find in stores. Start with small test pours to avoid wasting ingredients.
Try a base-middle-top approach similar to perfumery: pick one dominant note, one supporting middle note, and a subtle accent. Record the weight percentages for each test so you can replicate a favorite blend later.
Color and layering techniques
Using the dye blocks, you can create single-tone, layered, or marbled looks. You’ll have better results if you color the wax while completely melted and mix thoroughly.
For layers, allow each layer to partially set to a tacky surface but not fully cool, then pour the next color. This helps the layers adhere without blending together.
Presentation and gift ideas
The included stickers and labels make it simple to create thoughtful, attractive gifts. You can personalize labels with hand-written messages, use color-matched dyes to coordinate with seasonal themes, or create sets of matching scents.
Consider pairing a candle with a small card about the fragrance notes, or wrap tins in transparent cellophane with a ribbon for an extra special touch.
Environmental and health considerations
Using soy wax means you’re working with a plant-based material that burns cleaner than paraffin and isn’t petroleum-derived. You’ll still need to exercise caution with fragrance oils and dyes, as some people may be sensitive to strong scents.
You’ll want to avoid inhaling fumes while heating and mixing, so make candles in a well-ventilated area. Dispose of any unused wax responsibly — small home quantities are generally safe, but avoid pouring hot wax down drains.
Comparing with other starter kits
Compared to many entry-level kits, this one stands out for including a dedicated heating plate and pot rather than relying solely on double-boiler methods. That makes heating more efficient and less messy.
Other kits may include fewer fragrance options or not provide tins and jars. If you value having a complete set of vessels and multiple fragrances, this kit is competitively packed.
Advanced tips once you’re comfortable
When you’re past the basics, you can fine-tune wick selection and scent percentages for particular vessels. Test burn time and melt pool formation to match wick size to the diameter of each container.
You can also create layered or embedded designs, such as adding botanicals or mica dust for shimmer. Just ensure any additives are secured and won’t pose a combustion hazard when the candle burns.
Common mistakes beginners make
You’ll probably encounter a few predictable missteps, but they’re easy to fix once you know them. Avoid these common errors to save time and ingredients.
- Pouring when wax is too hot: This can cause cracking or poor adhesion to the container.
- Overloading fragrance: Too much oil can cause sweating or affect burn quality.
- Skipping wick testing: Different vessels need different wick sizes for optimal burn.
- Rushing the curing time: Scent throw and burn quality improve if you let the candle rest before burning.
Accept that mistakes are part of the process, and keep notes on each batch so you can refine your technique.
Packing and gifting your candles
The kit’s included jars, tins, stickers, and labels help you prepare thoughtful gifts right away. Use the provided lids and allow candles to cure upright and undisturbed before packaging for a clean look.
You can create themed gift boxes — for example, a relaxation set with lavender and chamomile blends — and add a card describing the scent profile and burn instructions.
Frequently asked questions
You’ll likely have some specific questions as you start using the kit, so here are clear answers to common concerns.
Q: Is the melting pot dishwasher safe? A: Most melting pots should be hand-washed to preserve coatings and avoid warping. Clean while warm (not hot) with a paper towel to remove excess wax, then wash with warm soapy water once cooled.
Q: How long should candles cure before burning? A: Let candles cure for at least 24–48 hours, though some fragrances benefit from a week of curing for a stronger, more balanced scent throw.
Q: Can you make other crafts with the melter? A: Yes, the 5-speed heat control allows you to melt materials for small crafts like lip balms or soap bases, but follow specific recipes and safety guidelines for those crafts.
Q: Are the fragrance oils phthalate-free and safe? A: The kit emphasizes natural plant wax, but you should check the fragrance labels or product documentation if you have specific health concerns or sensitivity to certain compounds.
Q: How do you choose the right wick? A: Start with the included wicks and test burn in each vessel. If you find tunneling or a small melt pool, try a thicker wick; if the flame is too large or soot forms, try a thinner wick.
Q: What if wax leaks from tins or jars? A: Ensure containers are clean and dry before pouring, and avoid overfilling. Let candles cool on a level surface to prevent slanted pours.
Final verdict
If you want to get started with candle making without tracking down individual supplies, this FAIRYELF Complete Candle Making Kit gives you a well-rounded set of tools and materials. You’ll enjoy the convenience of an included melter and the variety of scents, dyes, and vessels that let you grow from simple projects to more creative designs.
You’ll gain confidence after a few batches, and the kit’s thoughtful inclusions reduce common beginner frustrations. For hobbyists, gift-makers, and curious creators, this kit is a friendly, practical way to begin making candles at home.
Disclosure: As an Amazon Associate, I earn from qualifying purchases.