Christmas Candle Rolling Kit review
Want a simple, creative holiday activity that gives you handmade seasonal decor and meaningful gifts?
 - DIY Winter Candles Craft Project")
 - DIY Winter Candles Craft Project here.")
First Impressions
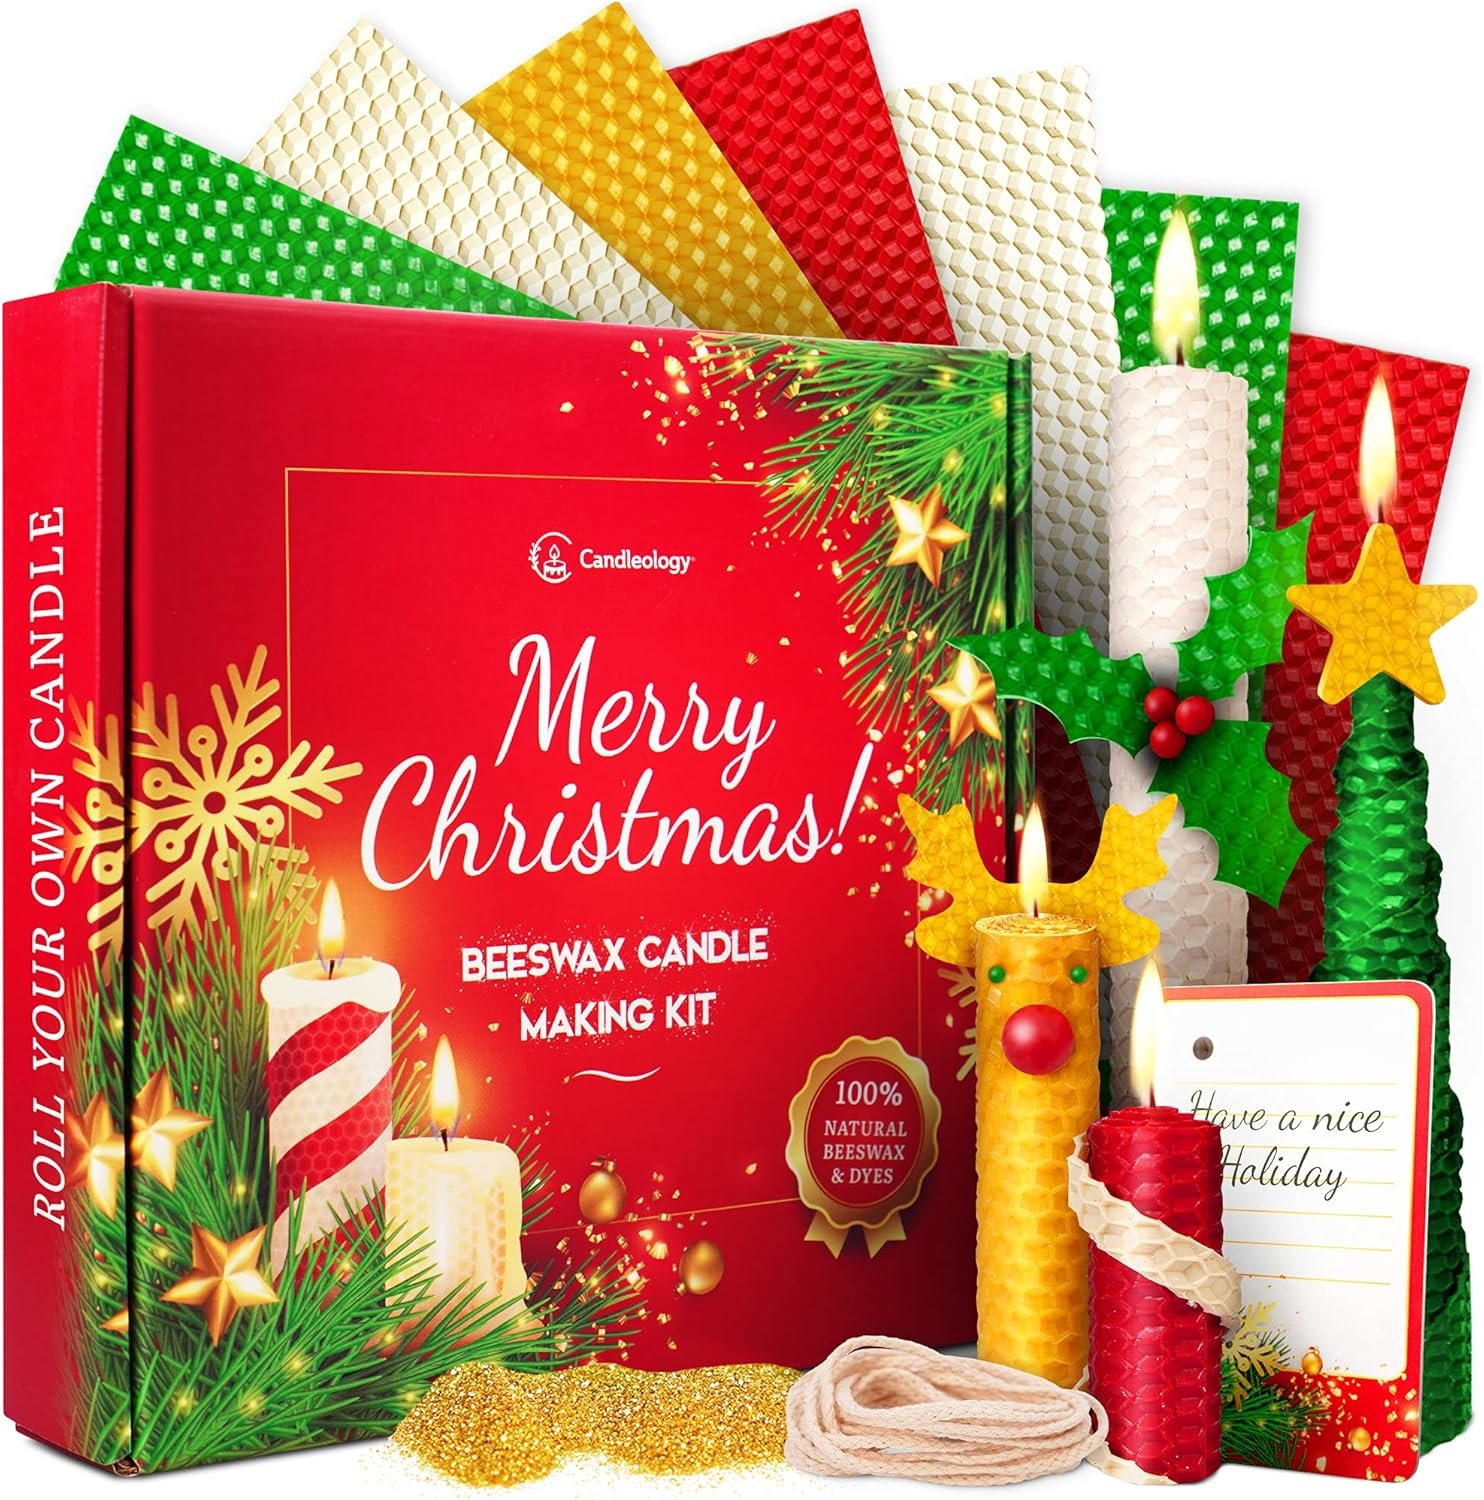
When you first see the Christmas Candle Rolling Kit – Beeswax Candle Making Kit for Kids & Adults (Christmas, Hanukkah, Kwanzaa) – DIY Winter Candles Craft Project you’ll notice how approachable it feels for both adults and children. The set looks compact and tidy, with natural-looking beeswax sheets and small, inviting extras that make you want to get started right away.
Packaging
The packaging is straightforward and usually keeps everything protected during shipping, which matters if you’re ordering the kit as a present. You’ll appreciate that the supplies come organized, so you don’t waste time hunting for missing parts when you begin crafting.
Aesthetic and Scent
The beeswax sheets come in festive colors (green, white, gold) that immediately fit into holiday decor and seasonal tablescapes. Beeswax typically carries a light, natural honey-like scent and these sheets retain a subtle aroma that adds to a cozy atmosphere without overpowering the room.
What’s Included
This kit is marketed as all-inclusive for holiday candle rolling, and it mostly delivers on that promise. You won’t need additional wax or complicated tools to make a dozen simple rolled candles, which is great if you want an uncomplicated craft session.
| Item | Quantity | Description |
|---|---|---|
| Grade B Beeswax Sheets | 7 sheets | Natural beeswax in green, white, and gold; no harmful additives listed |
| 100% Cotton Wick | 110 inches | Pre-cut or continuous wick length for multiple candles |
| Decorative Twine Thread | 40 inches | For wrapping or adding rustic accents to finished candles |
| Gold Glitter | 1 bag | Small bag for accenting finished candles (use sparingly) |
| Paper Tags | 3 tags | Blank tags for labeling candles as gifts or place settings |
| Instructions | 1 | Easy-to-follow printed instructions for rolling and finishing |
You’ll find the table handy as a quick checklist so you can confirm everything arrived before you begin. If you need more decorative options or more sheets, you can always pair this kit with additional beeswax sheets or ribbon you already have at home.
 - DIY Winter Candles Craft Project")
Materials and Quality
You’ll care about the quality of what you use because it affects burn performance and safety. This kit uses Grade B beeswax, cotton wick, and simple decorative extras that are suitable for craft projects and gifting.
Beeswax Sheets
Grade B beeswax sheets are a practical choice for rolled candles because they’re flexible and easy to manipulate without heating. You’ll notice these sheets have a natural look and some texture that gives your finished candles an authentic, handmade feel.
Wicks
The 100% cotton wick included is a sensible option for hand-rolled beeswax candles; natural fiber wicks burn cleaner than synthetic options. You’ll want to make sure the wick thickness matches the candle size you roll so the flame remains stable and the candle burns evenly.
Extras (twine, glitter, tags)
The twine, glitter, and tags add charm and personalization options, especially if you plan to give the candles as gifts or incorporate them into table settings. You’ll want to use the glitter sparingly and keep it away from the wick area to avoid adding excess particulates to the burn.
Ease of Use
This kit is designed with beginners in mind, and its concept is elegantly simple: you roll sheets around a wick. You’ll find the tactile nature of rolling is intuitive, and the instructions are meant to get you from unboxing to candle in hand quickly.
For Beginners
If you’ve never made a candle before, you’ll appreciate how the kit removes the need to melt wax and manage a double boiler. You’ll mainly focus on aligning the wick, rolling tightly and evenly, and trimming the wick for a clean burn.
For Kids
This is a great kit to use for family craft time because the steps are hands-on and provide immediate, visible results. You’ll need to supervise younger children closely around open flames when testing or burning the candles, and you may want to handle the final trimming and lighting for safety.
 - DIY Winter Candles Craft Project")
Step-by-step: How You Make a Candle
You’ll get the best results if you approach rolling with patience and a few simple techniques in mind. The process is quick enough to keep attention spans engaged and creative enough that each finished candle looks unique.
- Lay one beeswax sheet flat and place the cotton wick along one long edge, leaving a small tail at the top for lighting.
- Align the wick so it’s straight and centered longitudinally; position it so you’ll roll from the side with the wick to ensure a clean core.
- Start rolling tightly from the wick edge, keeping pressure even; a tight start prevents gaps and helps the candle hold together.
- Continue rolling until you reach the end of the sheet. If the sheet isn’t long enough for the size you want, you can overlap a second sheet slightly and continue rolling.
- Press the seam gently with your fingers so the wax adheres to itself; if the edges are stubborn, a warmed spoon or a quick touch of warm hands can help smooth the join.
- Trim the wick to about 1/4 inch (6 mm) above the top of the candle; this helps control the initial flame size and prevents smoking.
- Decorate: wrap twine around the base or tie a small bow, add a dusting of glitter away from the flame area, and attach a paper tag if you’re gifting the candle.
- Let the candles sit for a short time to firm up if any edges loosened during handling, then store them in a cool place before burning or gifting.
You’ll get better with practice, and after a few candles you’ll develop a rhythm that makes the process fast and satisfying.
Safety Tips
You’ll want to follow some basic safety precautions to ensure a fun and incident-free crafting session. These tips cover handling, burning, and storing the candles you create.
Supervision and Workspace
Keep kids supervised and set up a clean, flat workspace that’s free of clutter to prevent accidents. You’ll also want to avoid working near open flames during the crafting phase; only light candles when you’re ready to test or display them.
Burn Safety
When you burn your rolled beeswax candles for the first time, place them on a heat-resistant surface and keep them within sight at all times. You’ll need to trim the wick before each lighting to maintain a safe and steady burn, and keep the candle away from drafts, curtains, or anything flammable.
Storage and Handling
Store unused beeswax sheets and finished candles in a cool, dry place away from direct sunlight to prevent softening or color changes. You’ll want to keep the glitter and twine away from heat sources and store the wicks in a sealed package to avoid dust accumulation.
 - DIY Winter Candles Craft Project")
Burn Performance and Fragrance
Beeswax is well-known for offering a clean, steady burn and a faint natural fragrance that many people enjoy. Your finished candles should perform reliably if you roll them evenly and choose the right wick thickness.
Burn Time
A rolled beeswax candle’s burn time depends mostly on its diameter and wick. You’ll notice that thicker candles burn longer, and an appropriately sized wick will maximize burn efficiency while minimizing tunneling.
Soot and Smoke
Beeswax typically produces less soot than paraffin when burned cleanly, which makes these candles a better choice for indoor use. You’ll still need to trim the wick and avoid drafts to minimize smoke, but overall beeswax has a reputation for cleaner combustion.
Design Ideas and Decorations
You’ll have a lot of creative latitude with the kit’s components and a few extras from around the house. With deliberate choices, you can make candles that suit rustic, minimalist, or elegant holiday aesthetics.
- Rustic charm: use the included twine with a small pine twig and a paper tag, writing a name or holiday message with a calligraphy-style pen. You’ll create a cozy, handmade vibe ideal for family dinners or as hostess gifts.
- Elegant sparkle: lightly brush a bit of melted beeswax on the outer surface and sprinkle gold glitter around the base or top for a subtle shimmer. You’ll want to keep the glitter off the wick and flame area to avoid excess residue while burning.
- Layered colors: stack two colors of beeswax sheets with a narrow overlap to create a subtle stripe effect as you roll. You’ll be able to customize each candle to match table settings or gift palettes.
- Place-card candles: write names or tiny messages on the included tags and pair them with matching colored candles for a festive table setting. You’ll give guests a dual-purpose favor that also serves as decor.
You’ll find that a little thought and a few simple tools—such as a craft knife for trimming or small stamps for personalizing tags—can elevate your finished candles from cute to memorable.
Occasion Suitability
This kit is clearly tailored for seasonal celebrations, but it works beyond just one holiday. You’ll find it useful for Christmas, Hanukkah, Kwanzaa, winter solstice events, or any cozy gathering where handmade accents are appreciated.
Holiday Decor
The green, white, and gold color scheme fits many holiday palettes, and the candles make elegant additions to centerpieces or mantel displays. You’ll enjoy matching them with wreaths, garlands, or tablecloths for a cohesive seasonal look.
Everyday Use
If you like a natural candle for everyday ambiance, you’ll also be able to make neutral candles with the included sheets that suit year-round use. You’ll simply appreciate the warm glow and longer burn qualities that beeswax provides.
Gift Potential
This kit produces handcrafted gifts that feel personal and thoughtful, especially when you add handwritten tags and a bit of ribbon. You’ll notice that recipients often appreciate the time invested in making something unique rather than a generic store-bought item.
Packaging Suggestions
Wrap a small stack of your finished candles in tissue paper and tie with the included twine, then attach a tag with a short note or the year. You’ll create an attractive presentation without requiring fancy supplies, and the natural look of beeswax pairs well with kraft paper or wood shavings.
Personalized Touches
Add a custom scent by pairing the candle with a sachet of dried lavender or orange peel in the gift box (don’t attach scent materials directly to the candle’s surface). You’ll ensure the gift smells delightful and looks curated.
Pros and Cons
You’ll want a clear, balanced view before buying, so here’s what stands out.
Pros
- Simple to use: no melting required, great for beginners and kids (with supervision).
- Natural materials: beeswax and cotton wick are naturally derived and tend to burn cleaner.
- Inclusive kit: most of what you need is included, ideal for gifting and single-session crafts.
- Festive colors: green, white, and gold align with holiday decorating schemes.
- Creative: you’ll be able to customize finishes and presentation.
Cons
- Limited quantity: seven sheets may limit how many larger candles you can make, so you may need extras for groups or workshops.
- Small extras: glitter and twine amounts are modest, which may mean you’ll supplement for multiple gifts.
- Wick sizing: if you prefer very thick candles, the included wick may not be sufficient without modification.
You’ll find this kit offers great value for casual crafters or families wanting a fun holiday activity, but if you plan large-scale production you’ll want to purchase additional supplies.
Who Should Buy This
If you enjoy hands-on crafts and want simple, low-mess projects that yield beautiful results, this kit is for you. You’ll especially benefit if you want an activity that brings family and friends together for a relaxed, creative afternoon.
Perfect for Families and Beginners
You’ll love how accessible the process is, making it a wonderful shared activity across generations. Children can participate in the rolling and decorating steps, while adults can handle the finishing touches and safety oversight.
Ideal for Gifting and Seasonal Hosts
If you’re planning to give small, meaningful gifts or set an inviting holiday table, you’ll find these candles make thoughtful, handmade accents. You’ll also appreciate the effortlessness of the kit when you’re juggling holiday hosting responsibilities.
Alternatives and Comparisons
It helps to know how this kit stacks up against other candle-making options so you can choose what fits your skill level and goals. You’ll find different kits emphasize different methods and materials.
- Melt-and-pour kits: these require melting wax and handling hot liquid, which you might prefer if you want to experiment with scents and shapes. You’ll need more equipment and take stronger safety precautions.
- Pre-made votives or jar candles: these give a finished product without hands-on crafting, which is convenient but lacks personal involvement. You’ll miss the satisfaction of making each piece yourself.
- Larger beeswax sheet packs: if you plan to make many candles, buying bulk beeswax sheets separately can be more cost-effective. You’ll then have more flexibility with sizes and color combinations.
You’ll choose this rolled-sheet kit if you want simplicity and immediate tactile results without dealing with heat and melting.
Price and Value
You’ll likely find the kit reasonably priced compared with the cost of separate supplies, particularly for occasional crafters and gift-makers. The all-in-one convenience combined with natural materials gives you good bang for your buck if you value hands-on holiday projects.
Long-Term Value
If you enjoy candle-making enough to repeat the activity, you’ll probably buy additional beeswax sheets and wicks over time, which is still more economical than frequent store-bought candles. You’ll also accrue skills and small tools that expand what you can make next season.
Frequently Asked Questions
These practical answers aim to clarify common concerns you might have before buying or using the kit.
Q: Do you need any tools beyond what’s included? A: For basic rolled candles you don’t need anything additional beyond what’s in the kit, though a small sharp knife or scissors for trimming and a spoon to warm joins can be handy. You’ll also want a heat-resistant surface for testing burns.
Q: Are the beeswax sheets scented? A: Grade B beeswax sheets typically retain a light natural honey scent but don’t contain added fragrance unless specifically stated. You’ll get a pleasant, mild aroma rather than a heavy perfume.
Q: Are these candles safe for children to make? A: Children can participate in the rolling and decorating steps but should be supervised, especially when candles are lit. You’ll want an adult to handle trimming and the initial lighting.
Q: How long will a rolled beeswax candle burn? A: Burn time depends on candle diameter and wick size; a small rolled candle might burn for a few hours while a thicker one will last significantly longer. You’ll improve burn time by trimming the wick and burning away to an even pool.
Q: Can you add fragrance oils? A: You can add fragrance oils, but rolled-sheet candles are less suitable for adding scent directly unless you carefully melt and reapply wax or apply oils to interior layers. You’ll get better scent throw with poured wax methods if strong fragrance is your priority.
Q: Is the glitter safe when burning? A: Glitter should be used sparingly and kept away from the wick to avoid transfer into the flame; you’ll reduce soot and particulate risk that way. You’ll want to ensure any decorative material is non-combustible or positioned so it won’t contact the flame.
Q: Can you combine sheets to make larger candles? A: Yes, you can overlap sheets and roll them to create wider candles, pressing seams so the wax bonds well. You’ll want to ensure the wick is centered and long enough for the added diameter.
Q: Are the wicks pre-waxed? A: The product description lists 100% cotton wick but doesn’t specify pre-waxing; waxed or unwaxed wicks can work, though pre-waxed wicks often make the rolling process easier. You’ll find either type effective if you choose the right thickness for your candle size.
Troubleshooting Common Issues
You’ll run into a few common hiccups when you’re learning, and most are easy to fix with simple adjustments. The following tips help you solve problems quickly so you can enjoy smooth crafting sessions.
- Candle unrolling or loose seams: press the seam firmly and apply warm hands or a gently warmed tool to help the wax bond. You’ll also get better results if you start the roll tightly.
- Tunneling (candle burns down the center leaving wax at the edges): ensure the candle is wide enough for the wick, and give it a long first burn to form an even melt pool. You’ll reduce tunneling by using the correct wick thickness for the candle diameter.
- Smoky flame: trim wick to 1/4 inch before lighting and avoid drafts. You’ll also make sure no glitter or decorative material is too close to the flame.
Tips to Improve Your Finished Candles
Small techniques can significantly enhance the look and performance of your candles. You’ll impress friends and family when your candles both look polished and burn well.
- Warm edges slightly: a warm spoon or hand can smooth seams and make the candle look professionally finished. You’ll be careful not to overheat and soften the entire candle.
- Use thicker wick for larger diameters: thicker candles need a larger wick diameter to avoid tunneling and to maintain a steady burn. You’ll research recommended wick sizes by candle diameter if you plan to make different widths.
- Store flat and cool: stacking candles neatly and keeping them out of heat preserves their shape and color. You’ll avoid deformation by not placing heavy objects on top of rolled candles.
Making It a Group Activity
You’ll find this kit is ideal for holiday gatherings, craft nights, or classroom projects because the steps are accessible and results are immediate. Organize supplies, set up a decorating station, and let creativity run, while designating an adult to manage any final steps or flame-related tasks.
Activity Flow
Set up several stations: one for rolling, one for trimming and finishing, and one for decorating with twine or glitter. You’ll speed up the process and keep it fun by assigning simple roles so everyone contributes.
Storage, Care, and Longevity
Once you’ve made your candles, you’ll want them to look good and burn reliably over time. Proper care maximizes both their shelf life and burn performance.
- Keep candles in a cool, dry area away from sunlight to prevent warping or softening.
- Avoid stacking heavy items on candles to maintain their shape.
- Label kits or finished candles if you’re gifting them months later so recipients know to trim the wick before first burn.
You’ll find that properly stored beeswax candles can remain attractive and functional for a long time.
Final Verdict
You’ll enjoy the Christmas Candle Rolling Kit – Beeswax Candle Making Kit for Kids & Adults (Christmas, Hanukkah, Kwanzaa) – DIY Winter Candles Craft Project if you want a low-mess, hands-on holiday craft that produces charming, natural candles. It’s friendly to beginners, fun for families, and provides a thoughtful gift option while using natural materials and simple techniques that yield great results.
You’ll likely be pleased with the balance of convenience and creativity this kit offers, and with a few extra supplies on hand you can expand what you make year after year. If you value an accessible craft that provides immediate satisfaction and beautiful seasonal decor, this kit is a solid choice.
Disclosure: As an Amazon Associate, I earn from qualifying purchases.