
CraftBud Soy Candle Making Kit review
Want to make your own scented candles at home with a clean, user-friendly kit that works for both adults and kids?


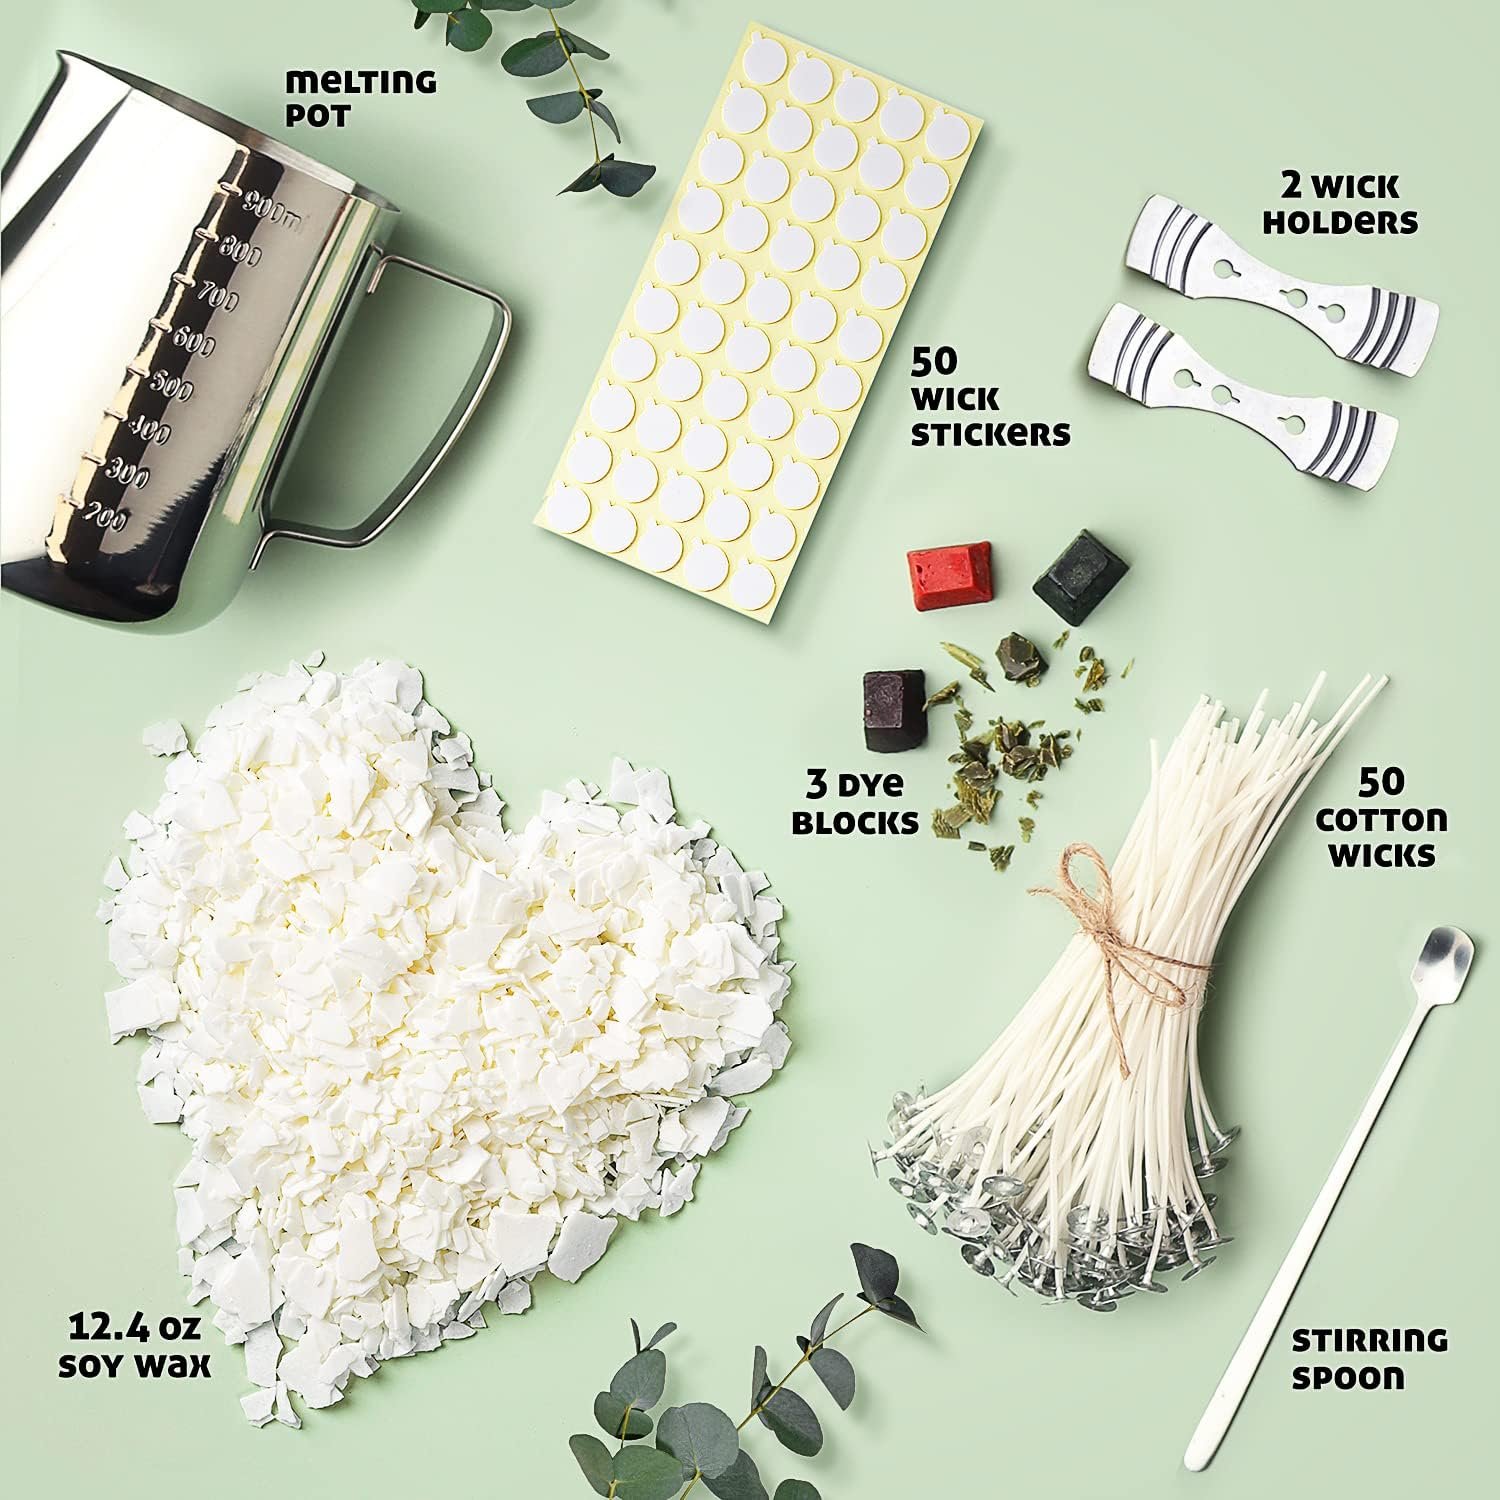
First impression of the CraftBud Soy Candle Making Kit for Adults & Kids, 12.4Oz Soy Wax, 108 PC DIY Kit Includes Wax Melter, Wicks, Dyes & More
You’ll notice this kit aims to be an all-in-one starter solution for hobbyists and families who want to craft candles without hunting down individual supplies. The packaging and included stainless steel tools feel sturdier than many bargain kits, giving you confidence before you even begin.
What’s included in the kit
The manufacturer packs 108 pieces designed to get you from unboxing to burning a candle with minimal extra purchases. You’ll still want to add your own containers and fragrance oils if you want scented results, but the kit provides the basics.
| Item | Quantity | Purpose / Notes |
|---|---|---|
| Soy wax | 12.4 oz | Natural soy wax base — enough for several small candles or one medium jar candle |
| Stainless steel pouring pot (900ml / 30oz) | 1 | Melting and pouring wax safely; reusable |
| Cotton wicks | 50 | Pre-tabbed wicks for multiple projects and practice |
| Wick stickers | 50 | Adhesive tabs to secure wicks to jar bottoms |
| Metal wick holders | 2 | Hold wick centered while wax sets |
| Stainless steel mixing spoon | 1 | Stirring and scooping melted wax and colorants |
| Wax dye colors | 3 | Small wax dye chips or blocks for visual color customization |
| Instruction guide | 1 | Basic soy candle making steps and tips |

Wax quality and quantity
The kit includes 12.4 ounces of natural soy wax, which is a clean-burning, renewable option compared with paraffin. For reference, that amount will make multiple smaller candles (tea light sized or votives) or one medium jar candle depending on your container size.
You should expect the soy wax to be soft to the touch at room temperature and easy to melt and pour. The quality is suitable for beginners; if you’re aiming for long-term batch production, you may eventually purchase larger quantities of soy wax.
Tools and accessories
The stainless steel pouring pot and spoon add a touch of professional convenience and are easy to clean after use. The metal wick holders are basic but effective for keeping your wick centered while curing.
You’ll appreciate the volume of spare wicks and wick stickers — they let you test different wick sizes, experiment with wick positioning, and recover from early mistakes without extra cost.

Colors and customization options
Three wax dye colors are included so you can tint your candles without dyes that fade quickly or bleed into the wax. These allow you to create two-tone or multicolored candles with simple layering techniques.
Remember that these dyes are for color only; the kit does not include fragrance oils or essential oils, so you’ll need to source scents separately if you want fragrant candles.
Unboxing and first-time setup
When you open the kit, lay everything out on a clean, heat-resistant surface so you can inventory items quickly and set up a safe workspace. Read the instruction guide first — it provides a straightforward sequence for melting, coloring, pouring, and setting your candles.
Gather a few extra items before your first session: containers or molds, a thermometer (helpful but not mandatory), and fragrance oils if you want scented candles. You’ll also want a clean rag and warm soapy water for quick cleanup.
Workspace preparation and safety
Create a clutter-free area on a table covered with newspaper or a silicone mat to catch drips and spills. Keep a fire extinguisher or a large metal lid nearby just in case, and never leave melting wax unattended.
Wear heat-resistant gloves and protective clothing to avoid burns, and keep children supervised closely if they help. The pouring pot is stainless steel and heats up quickly, so plan how you’ll move it safely from heat to pouring site.

Melting and pouring process
Start by cutting or measuring the wax into the pouring pot and melt slowly over a double boiler or low flame if you’re using stovetop. Stir gently and thoroughly to eliminate clumps and ensure even melting.
For soy wax, aim for a gentle heat; it doesn’t require extremely high temperatures. If you have a thermometer, take note of the wax temperature so you can experiment with optimal pouring temperatures for smoother finishes.
Adding color and fragrance
Add wax dye little by little until you reach the shade you want; a small amount goes a long way. If you’re using fragrance oils, follow recommended fragrance load percentages (commonly 6–10% by weight for soy wax) and stir well to fully disperse the scent.
Combine color and scent when the wax is at a safe mixing temperature — typically a few degrees below the highest melt temperature recommended for your wax — to help both elements incorporate uniformly.
Pouring technique and cooling
Pour slowly and steadily to avoid air bubbles and sinkholes; pour at a consistent height and allow the wax to level naturally. If you notice sinkholes or uneven surfaces, you can top pour later with a small amount of slightly warmer wax to fill imperfections.
Let your candle cool at room temperature for several hours. Rapid cooling (like placing it in a fridge) can cause cracking or frosting, especially with soy wax, so be patient.
Wick placement and trimming
Use the wick stickers to fix the wick tab at the center bottom of your container. Wrapping the top of the wick around a metal wick holder or a clothespin helps keep the wick perfectly centered while the wax sets.
Trim your wick to about 1/4 inch before the first burn to reduce smoking and maintain a stable flame. Regular trimming after each use will help the candle burn cleaner and last longer.

Who is this kit for?
This kit is designed for beginners, families, hobbyists, and anyone who wants to try candle making without buying large, specialized equipment. It provides reusable tools and numerous consumables so you can experiment and learn with minimal extra investment.
If you already make candles commercially, you’ll find the kit less suitable for large volumes, but it still serves as a portable or travel-friendly option for small batches, demos, or workshops.
Kids and family projects
Because the kit includes lots of spare wicks and simple tools, it’s very family-friendly when you supervise heat-related steps. Children can participate in color mixing, wick placement, and decoration once the hot steps are handled by an adult.
Plan activities in stages: let kids do the creative parts like choosing colors and containers, while you manage the melting and pouring. This structure keeps it safe and fun for everyone.
Beginners and adults
As a beginner you get a practical introduction to measurements, pouring temperatures, wick behaviors, and finishing touches. The included guide will help you start, and the reusable tools let you progress beyond a one-off project.
You may outgrow the included amount of wax or the small-scale dye packs if you fall in love with candle making, but this kit lowers the entry barrier and gives you a solid, economical start.
Safety and cleanup
Soy wax is generally safer than paraffin because it’s plant-based and tends to produce less soot, but it’s still hot and can cause burns. Treat melted wax with respect: work on heat-resistant surfaces, use proper tools, and manage children and pets away from the work area.
Clean up spilled wax by letting it harden then scraping it off surfaces, or use hot soapy water for tools; avoid pouring waste wax down the sink. Store leftover wax and tools in a cool, dry place away from direct sunlight.
Safe workspace tips
Use a double boiler or a temperature-controlled melting method to reduce the risk of overheating. Never leave your melting wax unattended, and keep flammable materials and loose clothing away from the heat source.
If a small fire starts with wax, do not throw water on it — smother the flame with a metal lid or use a class B fire extinguisher rated for flammable liquids.
Storage and shelf life
Soy wax and dye blocks have a long shelf life when stored in cool, dry conditions — typically a year or more without significant degradation. Keep fragrance oils in dark glass bottles and store them away from sunlight to preserve scent strength.
Label your leftovers with purchase dates so you can track freshness and rotate supplies over time.
Performance and results
When used correctly, soy wax offers a smooth, creamy finish and a slow, even burn. Because soy wax has a lower melt pool temperature, it tends to hold fragrance well and provide decent scent throw when you add appropriate fragrance loads.
The kit’s tools help produce neat, professional-looking candles with clean edges if you pour slowly and center your wick properly. Expect small learning-curve blemishes like sinkholes or slight frosting during early attempts — these are typical with soy wax and fixable.
Burn time and testing
Burn time depends on candle size, wick choice, and how you trim and burn the candle. A well-made soy candle can have good longevity and produce less soot than paraffin alternatives, but testing different wick sizes and container diameters is key.
Always perform a burn test for each new candle design: burn for one hour per inch of container diameter to establish how the candle behaves and to check for tunneling, excessive smoke, or uneven melt pools.
Appearance and finish
With careful pouring and slow cooling, your final candle will have a smooth top and a centered wick, especially when using the included wick holders. Soy wax sometimes develops “frosting” — a white crystalline look — which is cosmetic and doesn’t affect function, though you may prefer color choices and pouring temps that minimize it.
Color intensity may differ between batches; practice with incremental dye additions to match the shades you prefer.
Pros and cons
You’ll find this kit approachable and generous on consumables, but expect to add a few items like jars and fragrances to make fully finished, scented candles.
- Pros: stainless steel tools, many wicks and stickers, beginner-friendly guide, natural soy wax.
- Cons: small wax quantity for frequent makers, no fragrance oils or containers included, pouring pot could be larger for bigger batches.
| Strengths | Considerations |
|---|---|
| Good value for beginners — many consumables included | Wax amount is limited for repeated projects |
| Solid stainless steel accessories that last | No fragrance oils or glass jars included |
| Wide quantity of wicks and wick holders to practice with | Dye packs are basic — you might want more color choices later |
Tips to get the best results
Measure your wax and fragrance carefully; small percentage differences can significantly change fragrance throw and burn performance. Use a thermometer to learn the behavior of the soy wax and record temperatures and outcomes in a notebook for reproducibility.
If the top surface cracks or depresses as it cools, try a two-step pouring process: pour most of the wax, let it cool and settle, then top up with a small amount of slightly warmer wax to smooth the surface. Patience is often the key to professional-looking results.
Troubleshooting common problems
If your candle tunnels (burns down the center leaving wax around the edges), you likely need a larger wick or a different wick type for that container size. If your candle smokes or produces soot, trim the wick shorter and ensure you’re using a quality cotton wick without metal or excess char.
For frosting and white bloom on soy wax, that’s aesthetic only — it’s caused by natural crystallization. If it bothers you, try adding a small amount of vegetable paraffin (if you use it) or use darker dyes and pour at slightly higher temperatures to reduce crystallization.
Project ideas and creative variations
You can layer colors to make striped candles, embed small objects (non-flammable) in larger containers, or create two-tone votives using different dyes. Try wooden wicks or scented wax melts (with separate molds) if you want to expand your repertoire beyond traditional jar candles.
Host a mini workshop with friends or family where each person decorates and customizes their own jar; the kit’s many wicks make it easy to support group activities.
Gift idea and presentation
The kit itself makes a nice gift for a creative friend or family member, especially if you pair it with a few attractive glass jars and a bottle of fragrance oil. Add a handwritten card with a suggested first project or a small notebook for recording temperatures and outcomes to make it extra thoughtful.
If you’re giving it to a child or teenager, include a session where you handle the hot steps and let them do the decorating and color mixing for a safe, memorable experience.
Value for money
Given the volume of consumables and the inclusion of stainless steel tools, this kit offers strong value for casual makers and first-timers. You won’t need to buy many replacement items immediately thanks to the 50 wicks and spare accessories.
If you plan to make candles regularly or sell them, bulk wax and fragrance purchases will be more economical in the long run, but this kit remains a cost-effective way to start.
Environmental and material considerations
Soy wax is biodegradable and derived from soybean oil, making it a better option environmentally compared to petroleum-based paraffin. The stainless steel tools are recyclable and long-lasting, reducing single-use waste.
Try to choose recyclable glass jars and avoid plastic whenever possible, and responsibly dispose of or store leftover wax for future projects.
Comparison with other beginner kits
Compared with many entry-level kits that include plastic tools or tiny quantities of dye, this CraftBud kit stands out for its metal pouring pot and abundance of wicks. Some competitor sets include fragrance oils or glass containers, but you’ll often pay more for those additions.
If you want a kit that’s strictly fragrance-included, you might choose a different bundle; however, the flexibility to pick your own scents can be an advantage for tailoring results to your preferences.
Final verdict
If you want a friendly, reasonably priced way to start making soy candles at home with tools that feel durable, this kit is a solid choice. It gives you a comfortable learning curve with enough supplies to practice and create pleasing results without a big initial investment.
You’ll likely need to add containers and fragrance oils, but the included stainless steel tools and plentiful wicks make this kit a gratifying and practical start to your candle-making hobby.
Frequently Asked Questions
Do I need anything else to make candles with this kit?
Yes — while the kit includes wax, tools, and dyes, you’ll also need containers or molds and, if you want scented candles, fragrance or essential oils. A thermometer and extra containers will improve accuracy and let you scale projects reliably.
Is the included soy wax enough for multiple candles?
The 12.4 oz of soy wax will make several small candles or one medium-sized candle, depending on container volume. If you plan multiple sessions or larger jars, you’ll want to buy additional wax in bulk.
Can children use this kit safely?
Children can participate in safe parts like choosing colors, placing wick stickers, and decorating finished candles, but an adult must handle melting and pouring due to hot wax. Always supervise closely and follow safety instructions.
How long do the candles made with this wax burn?
Burn time depends on candle size, wick size, and burn habits, but soy wax typically burns slower than paraffin, giving you good burn duration for its volume. Test different wick sizes with a single burn test to determine best burn time for your jars.
Will the dye affect the scent?
Dyes are designed to color the wax and generally shouldn’t significantly alter the scent if used properly. Always add fragrance oils at the recommended load and mix thoroughly to ensure even scent distribution.
What if my candle frosting or cracks?
Frosting is common with soy wax and is cosmetic only; it doesn’t affect performance. To minimize frosting or cracks, try slightly higher pour temperatures and allow the candle to cool slowly at room temperature.
How do I dispose of leftover wax?
Let leftover wax harden, then scrape or peel it from containers and store it in an airtight bag for future use, or repurpose it into wax melts. Avoid pouring wax down the sink.
Can I sell candles made from this kit?
You can create and sell candles, but you should follow local regulations for labeling and safety testing, especially regarding fragrance load, burn tests, and ingredient disclosures. For a commercial venture, consider larger supply purchases and professional-grade syringes and molds.
How do I choose the right wick?
Wick selection depends on container diameter and wax type. Start with the included wicks and perform burn tests — if you get tunneling, switch to a larger wick size; if you get excessive smoking, try a smaller or different type wick.
Are the tools dishwasher safe?
Stainless steel tools are generally hand-wash safe with warm, soapy water and should be rinsed thoroughly. Avoid putting the pouring pot in a dishwasher if wax residue is present; heat can spread wax into dishwasher drains.
If you want, you can ask for a step-by-step beginner project using only what’s in the kit (plus jars and fragrance), or request a shopping list of recommended extras to buy before your first session.
Disclosure: As an Amazon Associate, I earn from qualifying purchases.